Unlock the Secret to Easy Homemade Fruit Bars: Basic Recipe & 3 Delicious Variations
Have you ever gazed longingly at those wholesome-looking fruit and nut bars in the grocery aisle, only to flinch at the price tag? Or perhaps you've wondered about the exact ingredients tucked inside, wishing for more control over your family's snacks? Good news! Making your own delicious, nutritious fruit bars at home is not only incredibly simple but also surprisingly cost-effective. Forget the magic; it's pure kitchen science, and we're here to demystify it for you. Get ready to create delightful treats that are neither too dry and crumbly nor overly moist and sticky – just perfectly chewy and satisfying. For years, the idea of replicating those popular Lara Bar-style treats seemed beyond reach. How do you transform a handful of natural ingredients into that signature texture? The truth is, all you need is a basic understanding, a powerful appliance, and a little creativity. In this comprehensive guide, we'll walk you through a foolproof basic fruit bars recipe and show you how to truly make it your own. Get ready to learn the ultimate fruit bars recipe; add a pinch of your personality, and enjoy!The Simplicity of Homemade Fruit Bars: Why You'll Love Them
Embracing homemade fruit bars offers a myriad of benefits that extend far beyond just saving a few dollars. When you take control of your snack production, you gain:- Ingredient Control: No more cryptic labels! You choose every single component, ensuring only the freshest, highest-quality ingredients make it into your bars. This is especially important for those managing allergies or dietary restrictions.
- Cost Savings: Store-bought fruit bars can be surprisingly expensive, especially for a family that enjoys them regularly. Making them yourself slashes the cost significantly, allowing you to enjoy these healthy snacks without breaking the bank. If you're looking to cut down on grocery costs without sacrificing healthy snacks, making these homemade treats is a game-changer. Discover more ways to save with DIY Fruit Bars: Save Money with Simple Ingredients & Custom Flavors.
- Customization Galore: This is where the fun truly begins! Our basic fruit bars recipe allows you to add a pinch of whatever flavors you love, catering to individual preferences or seasonal ingredients. From sweet to tart, nutty to chocolatey, the possibilities are endless.
- Nutrient Boost: Homemade bars are naturally packed with fiber, healthy fats, and natural sugars from fruits and nuts. You can even strategically incorporate "secret ingredients" for an extra nutritional punch, making them ideal for school lunches, post-workout fuel, or a quick energy pick-me-up. These delicious no-bake snacks aren't just easy; they're packed with wholesome ingredients, making them a fantastic alternative to store-bought options. For more ideas on boosting the nutritional value, check out Healthy Lara Bar Style Treats: Easy Recipe & Nutrient Boost Tips.
- No Unwanted Additives: Say goodbye to artificial sweeteners, preservatives, and mystery ingredients. Your homemade bars are clean, whole, and pure.
Essential Ingredients for Your Basic Fruit Bars Recipe (Add a Pinch of Creativity!)
The beauty of these bars lies in their minimalist ingredient list. You don't need exotic items; just a few foundational components and your imagination.The Core Duo: Dates & Nuts
These two form the backbone of your homemade fruit bars, providing both structure and essential nutrients.
- Dates: The Natural Sweetener & Binder
Dates are truly the star here. Their natural stickiness, when processed, creates a thick, sweet paste that acts as the perfect glue for your bars. They also provide natural sugars and a good dose of fiber.- Medjool Dates: Often preferred for their larger size, softer texture, and rich, caramel-like flavor. Their high moisture content makes them ideal for processing.
- Deglet Noor Dates: Smaller and firmer, these work well too, but you might need to soak them in warm water for 10-15 minutes and drain well before processing if they seem particularly dry.
- Nuts: For Crunch, Texture, and Healthy Fats
Nuts contribute a wonderful contrast to the sweetness of dates, adding a satisfying crunch and healthy fats.- Almonds: A classic choice, offering a mild, buttery flavor.
- Cashews: Creamy and slightly sweet, perfect for a smoother texture.
- Walnuts: Earthy and robust, pairing well with richer flavors.
- Pecans: Buttery and sweet, excellent in dessert-like bars.
Flavor Enhancers: The "Add a Pinch" Factor
This is where you can truly make your fruit bars recipe unique. Think of your pantry as a treasure chest of possibilities!
- Dried Fruits: Beyond dates, adding other dried fruits like cherries, cranberries, apricots, figs, or even freeze-dried berries can introduce new dimensions of flavor and chewiness.
- Seeds: Chia seeds, flax seeds, hemp hearts, or sesame seeds not only add texture but also boost omega-3s and fiber.
- Cocoa Powder/Chocolate Chips: For the chocolate lovers! Use unsweetened cocoa powder for a rich depth or mini chocolate chips for pockets of melted sweetness.
- Coconut Flakes: Shredded or desiccated coconut adds a tropical note and can help bind the mixture while adding volume.
- Spices & Extracts: A pinch of cinnamon, nutmeg, cardamom, vanilla extract, almond extract, or even a dash of instant espresso powder can elevate the flavor profile. Fresh lemon or orange zest provides a bright, zingy kick.
My Secret Ingredient for a Nutrient Boost
Especially when making these for kids (or myself!), I love to sneak in a scoop of high-quality smoothie powder. These often contain freeze-dried greens, berries, and fruits, effortlessly boosting the vitamin and mineral content without altering the taste significantly. It's a fantastic way to ensure everyone gets a little extra goodness!
Equipment You'll Need
A good food processor is your best friend for this recipe. Its powerful blades can quickly break down and combine the ingredients into the desired sticky consistency. If you only have a basic blender, you might need to work in smaller batches (e.g., a quarter of the recipe at a time) and be prepared to stop and scrape down the sides frequently.
The Basic Fruit Bars Recipe: A Step-by-Step Guide
Once you've chosen your ingredients, the hardest part is over. Now, let's get down to the simple process of making these delightful bars!The Golden Ratio Rule
For a perfectly balanced fruit bar, a good rule of thumb is to use roughly equal parts dates, nuts, and additional flavoring ingredients by volume. For example, 1 cup dates, 1 cup nuts, and 1 cup of dried fruit/seeds/cocoa mix.
Let's Get Processing!
- Prep Your Ingredients: Ensure dates are pitted. If using very dry dates, a quick soak (then drain) can help. Measure out your nuts and flavor enhancers.
- Start with the Nuts: Add your chosen nuts to the food processor first. Pulse them a few times until they are coarsely chopped. This helps prevent them from getting completely pulverized into butter and also prevents the mixture from sticking excessively to the blades later.
- Add Dates & Flavors: Now, add the pitted dates and your primary flavor enhancers (dried fruit, cocoa, etc.) to the food processor with the nuts. If using any liquid extracts (vanilla, almond), add those now too.
- Process Until Combined: Begin processing, pulsing at first, then letting it run continuously. The mixture will go from crumbly to clumpy, eventually forming a thick, sticky "dough" that pulls away from the sides of the bowl. Stop periodically to scrape down the sides of the bowl with a spatula.
- Check for Consistency: The goal is a mixture that, when pressed firmly between your fingers, sticks together easily without being overly sticky or wet.
- Too Crumbly? If the mixture isn't coming together, add one or two extra dates (or a tiny splash of water) and process a few more rounds.
- Too Sticky/Gooey? If it's too wet and sticks excessively to your fingers, add a tablespoon or two of coconut flakes, oat flour, or more ground nuts/seeds and process again.
Shaping and Setting Your Bars
- Prepare Your Dish: Line a small casserole dish (8x8 inch is common) or baking pan with parchment paper or cling film, leaving plenty of overhang on all sides. This "sling" will make it incredibly easy to remove the finished block.
- Press the Mixture: Transfer the fruit bar mixture into the prepared dish. Use your fingers or the back of a spoon to distribute it evenly across the bottom.
- Compact & Smooth: Cover the top of the mixture with the excess parchment or cling film. Then, using a flat object like another small pan, a measuring cup, or even your hands, press down firmly and evenly across the entire surface. This compacts the mixture, making for dense, cohesive bars and a smooth top.
- Chill (Recommended): For easiest cutting, place the pressed mixture in the refrigerator for at least an hour. You can skip this step if you're in a hurry, but chilling definitely yields cleaner cuts.
- Slice & Serve: Once chilled, use the parchment/cling film overhang to lift the entire block out of the dish. Remove the top layer of film. Place the block on a cutting board and slice it into your desired bar size using a sharp knife.
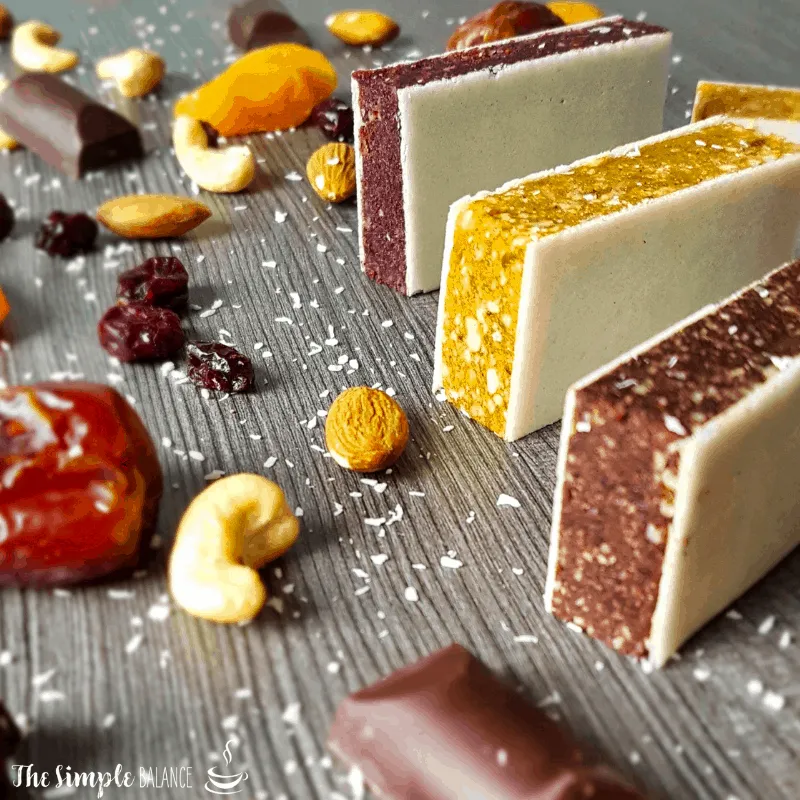
3 Delicious Variations to Elevate Your Fruit Bars Recipe (Add a Pinch of Flavor!)
Now that you've mastered the basic technique, let's explore some incredibly popular and satisfying flavor combinations. Remember, these are just starting points for your fruit bars recipe; add a pinch of your preferred spices or extracts to truly make them your own!1. Cherry Almond Delight
A classic for a reason – sweet cherries and earthy almonds are a match made in heaven.
- Ingredients:
- 1 cup pitted Medjool dates
- 1 cup raw almonds
- 1 cup dried tart cherries
- ½ teaspoon almond extract (optional, for extra almond kick)
- Method: Follow the basic recipe. Pulse almonds first, then add dates and dried cherries. Process until combined. Stir in almond extract at the end if using.
2. Lemon Coconut Zest
Bright, zesty, and tropical – perfect for a refreshing energy boost.
- Ingredients:
- 1 cup pitted Medjool dates
- 1 cup raw cashews
- ½ cup shredded unsweetened coconut, plus 2 tbsp for rolling (optional)
- Zest of 1 large lemon (about 1 tbsp)
- 1 tbsp fresh lemon juice
- Method: Process cashews first. Add dates, ½ cup coconut, lemon zest, and lemon juice. Process until well combined. If desired, roll the finished bars in the remaining 2 tbsp of shredded coconut for extra flavor and visual appeal.
3. Chocolate Peanut Butter Power
An irresistible combination that tastes like a treat but fuels like a healthy snack.
- Ingredients:
- 1 cup pitted Medjool dates
- 1 cup roasted peanuts (or other nut like cashews if preferred)
- ¼ cup unsweetened cocoa powder
- 2 tbsp natural peanut butter (creamy or crunchy)
- Pinch of sea salt (enhances chocolate flavor)
- Method: Process peanuts first. Add dates, cocoa powder, peanut butter, and sea salt. Process until a thick, uniform dough forms. This fruit bars recipe is a guaranteed crowd-pleaser!
